Introduction
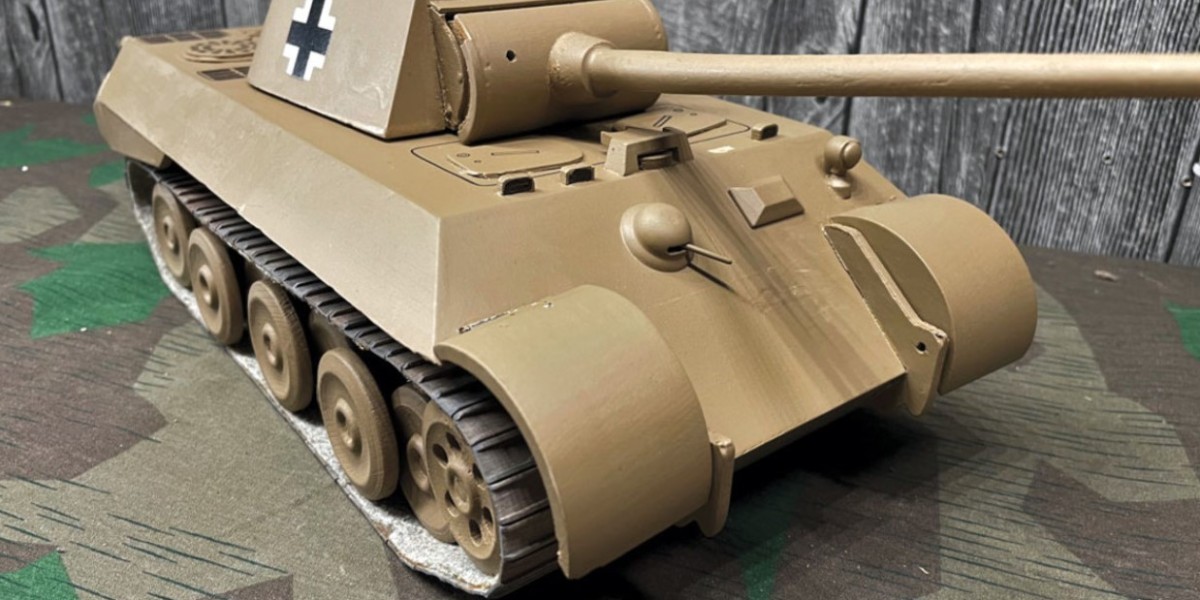
Building large-scale model tanks is a rewarding and challenging hobby that allows you to combine history, engineering, and creativity. Unlike smaller models, large-scale tanks offer greater opportunities for detail and customization. Whether you are a seasoned modeler or just beginning, this comprehensive guide will walk you through the process of constructing a large-scale tank from start to finish, ensuring a high level of realism and craftsmanship.
Why Build Large-Scale Model Tanks?
The Appeal of Bigger Models
Large-scalemodel tanks are not only visually impressive but also allow for a higher degree of detail. With larger models, you can incorporate more intricate features like functioning tracks, realistic weathering, and even moving turrets. The size allows for precision that smaller models can't always accommodate, making them ideal for serious hobbyists looking to push their skills to the next level.
Historical and Engineering Accuracy
Another major advantage of large-scale tanks is their potential for historical and mechanical accuracy. The bigger the scale, the more accurately you can replicate the actual dimensions, textures, and moving parts of the real tank. For history buffs, this means an opportunity to bring historically significant vehicles to life with unparalleled authenticity.
Choosing the Right Scale for Your Model
Popular Large Scales: 1/16, 1/10, 1/6
The most popular large-scale tanks are typically built in scales such as 1/16, 1/10, and 1/6. At 1/16 scale, tanks are usually around 12 to 18 inches long, while at 1/6 scale, they can be over 3 feet in length. Each scale offers different challenges and opportunities for detail, so selecting the right scale depends on your skill level, available space, and the amount of time you want to dedicate to the project.
Factors to Consider When Choosing a Scale
When choosing the scale for your model, consider the following factors:
Space: Large-scale tanks require significant display and storage space.
Budget: Bigger models often come with a higher price tag for both kits and materials.
Time Commitment: Larger scales require more time for assembly and detailing.
Carefully weighing these factors will help you select the right scale that suits your goals and abilities.
Tools and Materials Needed for Large-Scale Builds
Essential Tools for Precision
To build a large-scale tank model, you will need a variety of tools, including:
Precision cutters and hobby knives
Sanding blocks and files for smoothing edges
Tweezers for handling small parts
Clamps and masking tape to hold parts in place during assembly
Drills and pin vises for adding detail holes and fastenings
Materials: Plastic, Resin, and Metal
Large-scale tank models are often made from plastic, resin, or metal. Many kits come with plastic components, but advanced modelers may choose to incorporate resin parts for finer detailing or metal parts for increased durability and realism. Be sure to have the appropriate glue, cement, and other adhesives for working with these materials.
Step-by-Step Guide to Building a Large-Scale Model Tank
Researching the Tank Model
Before starting, research the specific tank you’re building. Understanding its historical context, design features, and markings will help you accurately replicate the real vehicle. Look for historical photos, blueprints, and diagrams to guide your build.
Prepping the Parts
Once you have your model kit, begin by prepping the parts. This involves cleaning off any mold lines, flash, or imperfections from the casting process. Sand or file edges for a clean fit, ensuring that each part is ready for assembly.
Assembling the Chassis and Hull
Start by assembling the main chassis and hull of the tank. These are the foundation of your model, so take extra care to ensure all parts align correctly. Use clamps or rubber bands to hold parts together while the glue sets to prevent any warping or misalignment.
Adding Details: Turrets, Tracks, and Suspension
Next, move on to the more intricate details like turrets, tracks, and suspension systems. Many large-scale kits feature moving tracks and suspension components, so patience and precision are key at this stage.
Advanced Techniques for Detailing
Adding Rivets, Bolts, and Panel Lines
To increase the realism of your tank, consider adding extra detailing such as rivets, bolts, and panel lines. Many modelers use aftermarket parts or create custom details using plastic card or photo-etched metal. Scribing tools can help you create clean, realistic panel lines.
Weathering: Mud, Rust, and Damage
Weathering adds a layer of authenticity by simulating wear and tear on the tank. Techniques like dry brushing, washes, and the use of weathering pigments can replicate mud, rust, and operational damage. Consider adding chipped paint, oil streaks, or battle damage for added realism.
Painting Large-Scale Model Tanks
Preparing the Surface for Paint
Before painting, it’s essential to clean and prime the model. A primer helps the paint adhere better and reveals any imperfections you may need to fix before applying the final coats.
Applying Base Coats and Camouflage Patterns
Start with a base coat, which is the primary color of your tank. Then, using masking techniques, you can apply camouflage patterns. Airbrushes are ideal for this, as they offer smooth transitions between colors.
Using Airbrushes for Fine Details
An airbrush is a must-have tool for large-scale models. It allows for the precise application of paint, especially when detailing fine features such as camouflage, shading, or highlights.
Adding Realism: Decals, Markings, and Insignia
Once the paint job is complete, add decals, markings, and insignia to make your model historically accurate. Use setting solutions to ensure the decals lay flat on the surface, and apply a protective varnish afterward to seal them in place.
Incorporating Electronics: Moving Parts, Lights, and Sounds
For those looking to take their large-scale tank to the next level, incorporating electronics is an option. Adding motors for moving parts, LEDs for lights, and sound modules for engine noises can bring your model to life. This step requires additional planning and space within the model to house electronic components.
Creating a Display for Your Large-Scale Tank
Building a Diorama Base
A diorama can turn your model into a complete scene. Use foam board, plaster, or clay to create terrain, and paint it to match the environment your tank would have operated in, whether it’s a muddy battlefield or a sandy desert.
Adding Terrain and Environmental Elements
Consider adding environmental elements such as trees, grass, or water effects to your diorama. These small touches can make the scene more immersive and showcase your tank in action.
Maintaining and Storing Your Large-Scale Model
Given the size of these models, proper storage and maintenance are essential. Keep them in a dust-free environment, and handle them with care to prevent damage. Periodically clean the model with a soft brush or compressed air to keep it looking its best.
Common Mistakes to Avoid When Building Large-Scale Tanks
Rushing the build: Take your time to ensure each part is properly aligned and detailed.
Overloading with details: While detail is important, overcomplicating certain areas can detract from the overall look.
Skipping research: Historical accuracy is key to building a convincing model, so always research the tank before starting.
Conclusion
Building a large-scale model tank is a rewarding project that combines skill, patience, and creativity. From the initial research phase to the final touches of weathering and detailing, the process allows you to create a realistic and historically accurate replica of these iconic military machines. Whether you’re a beginner or an experienced modeler, following these steps will help you achieve impressive results.
Frequently Asked Questions
What scale is best for beginners in large-scale tank building?
The 1/16 scale is often recommended for beginners due to its balance between size and ease of handling.What materials are commonly used for large-scale models?
Plastic, resin, and metal are the most common materials, with plastic being the most accessible for beginners.How do I add realistic weathering to my tank?
Techniques like dry brushing, washing, and using weathering pigments can simulate dirt, rust, and operational wear.Is it difficult to incorporate electronics into a model tank?
Adding electronics requires planning and some basic knowledge of wiring, but many kits are designed to accommodate moving parts and lights.What tools are essential for building large-scale tanks?
Key tools include precision cutters, files, tweezers, clamps, and an airbrush for painting.
Our Social Pages:
https://plastic-models-store.com/
https://www.facebook.com/plastic.models.store
https://www.instagram.com/plastic_models_store/
https://www.youtube.com/channel/UCKpiM8Q6k2XjOwN9lW0fOrw