Rib Confine Drawing Step by Step
The human body is comprised of numerous unmistakable parts that meet up to frame a total construction. One of the main parts of the human body is the skeleton. Comprised of various bone designs, it gives inflexibility to the body and safeguards significant organs. Visit the winnie the pooh drawing.
The rib confine is perhaps of the most complicated and significant design, and it assists with safeguarding parts like the heart and lungs. It can likewise be very interesting to figure out how to draw a rib confine because of its complicated construction.
That is the thing this guide is hanging around for, in any case, and we will show you how it tends to be done without any problem! We trust that you partake in our bit by bit guide on the most proficient method to draw a rib enclosure, and we likewise trust it demonstrates fun and supportive for you to utilize.
Stage 1 - rib confine drawing
This aide on the most proficient method to draw a rib enclosure will have a few precarious subtleties and points to draw, so we will take things gradually and separate it into more modest advances.
Until further notice, we will be beginning with the foundation of the rib confine. Utilize a few bended lines that beginning close to the lower part of the focal point of the rib confine and broaden them outward as they show up in the reference picture. Then, at that point, we will expand a few long, meager and bended shapes out and afterward back in to frame the ribs of the rib confine.
These will be a piece more modest at the base, yet they will get bigger as you climb. Whenever you have drawn these ribs, we can then begin drawing the following part of the rib confine.
Stage 2 - Presently, draw a few additional ribs for the rib confine
Progressing forward with this rib confine drawing, we will add yet more ribs onto it. In the first place, utilize a few additional bended lines to draw the focal, branch-like designs that the ribs will stretch out from.
Whenever that is drawn, we will then, at that point, be drawing a few additional ribs reaching out up. Likewise with the last step, these ribs will get somewhat longer the further you climb. Any other way, you can involve the very technique for these ribs that you utilized for the earlier ones. At the point when you're prepared, we can then continue on to stage 3 of the aide.
Stage 3 - Next, draw an additional ribs and add to the focal design
In this third step of our aide on the most proficient method to draw a rib confine, we will begin drawing the focal construction of the rib enclosure, and this is known as the sternum.
You have proactively begun the foundation of the sternum, and in this part we will involve a few rough vertical lines for its sides. Whenever those are drawn, the subsequent stage will be to coax a few additional ribs reaching out of the sternum.
Much as you accomplished for the past ribs, these ones will be made out of two areas each, and we will expand two from each side of the sternum. We will then, at that point, be polishing off the diagrams for the front of the rib confine in the subsequent stage.
Stage 4 - Draw the remainder of the front of the rib confine
Before you add the last contacts and variety to your rib confine drawing, we will polish off the last layouts for the front of the rib confine. First you can polish off the highest point of the sternum utilizing a few comparative lines to the ones that you have been utilizing.
Then, at that point, we will draw one more segment on top of the sternum. This part is known as the manubrium, and as displayed in the reference picture it is molded a piece like a short, squat T shape. Over this part, you can then draw the highest point of the fundamental segment.
Whenever that is drawn, we will add a few additional ribs. There will be two from the sternum and afterward two more from the manubrium, and they will likewise get more modest as they get higher up.
Stage 5 - Add the last contacts for your rib confine drawing
It's nearly time for the last step of this aide on the most proficient method to draw a rib confine. Yet first we will draw the ribs at the rear of the rib confine. Fortunately, these will be simpler to draw than the initial ones were. To draw these ones, we will involve a few strong dark in the middle of between the ribs at the front of the enclosure.
The reference picture will likewise show you how you can position these. When these back ribs are drawn, you will be prepared for the last step! You could likewise add to the drawing, maybe by adding a few additional bones that would be joined to the rib confine.
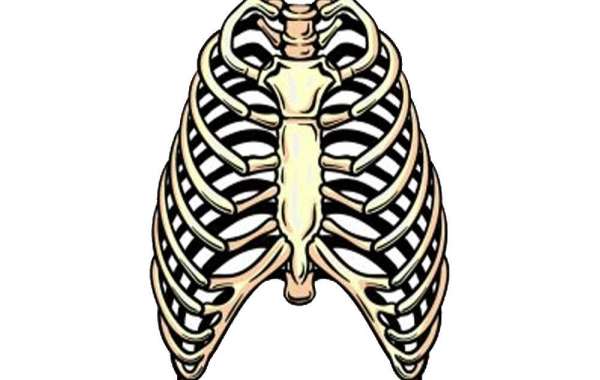
Stage 6 - Polish off your rib confine drawing with some tone
Individuals frequently envision unresolved issues unadulterated white, yet this is really not the situation with genuine bones. For our illustration of this rib confine drawing, we polished it off for certain more reasonable tones.
These varieties incorporate a few quieted tones of shouts and earthy colors, as displayed in our reference picture. You can involve this as an aide in the event that you would like a few correspondingly sensible tones, however you can likewise switch around the varieties assuming you wish!
While shading in, you might need to utilize a medium that considers accuracy, as there are a little parts to variety.